Accessing Amazon RDS From AWS EKS
Contents
- Premise
- Setup the MySQL Database - Amazon RDS
- Setup the EKS cluster
- Let's build the bridge!
- Test the connection
1. Premise
When moving your services to the Kubernetes ecosystem for the first time, it is best practice to port only the stateless parts to begin with.
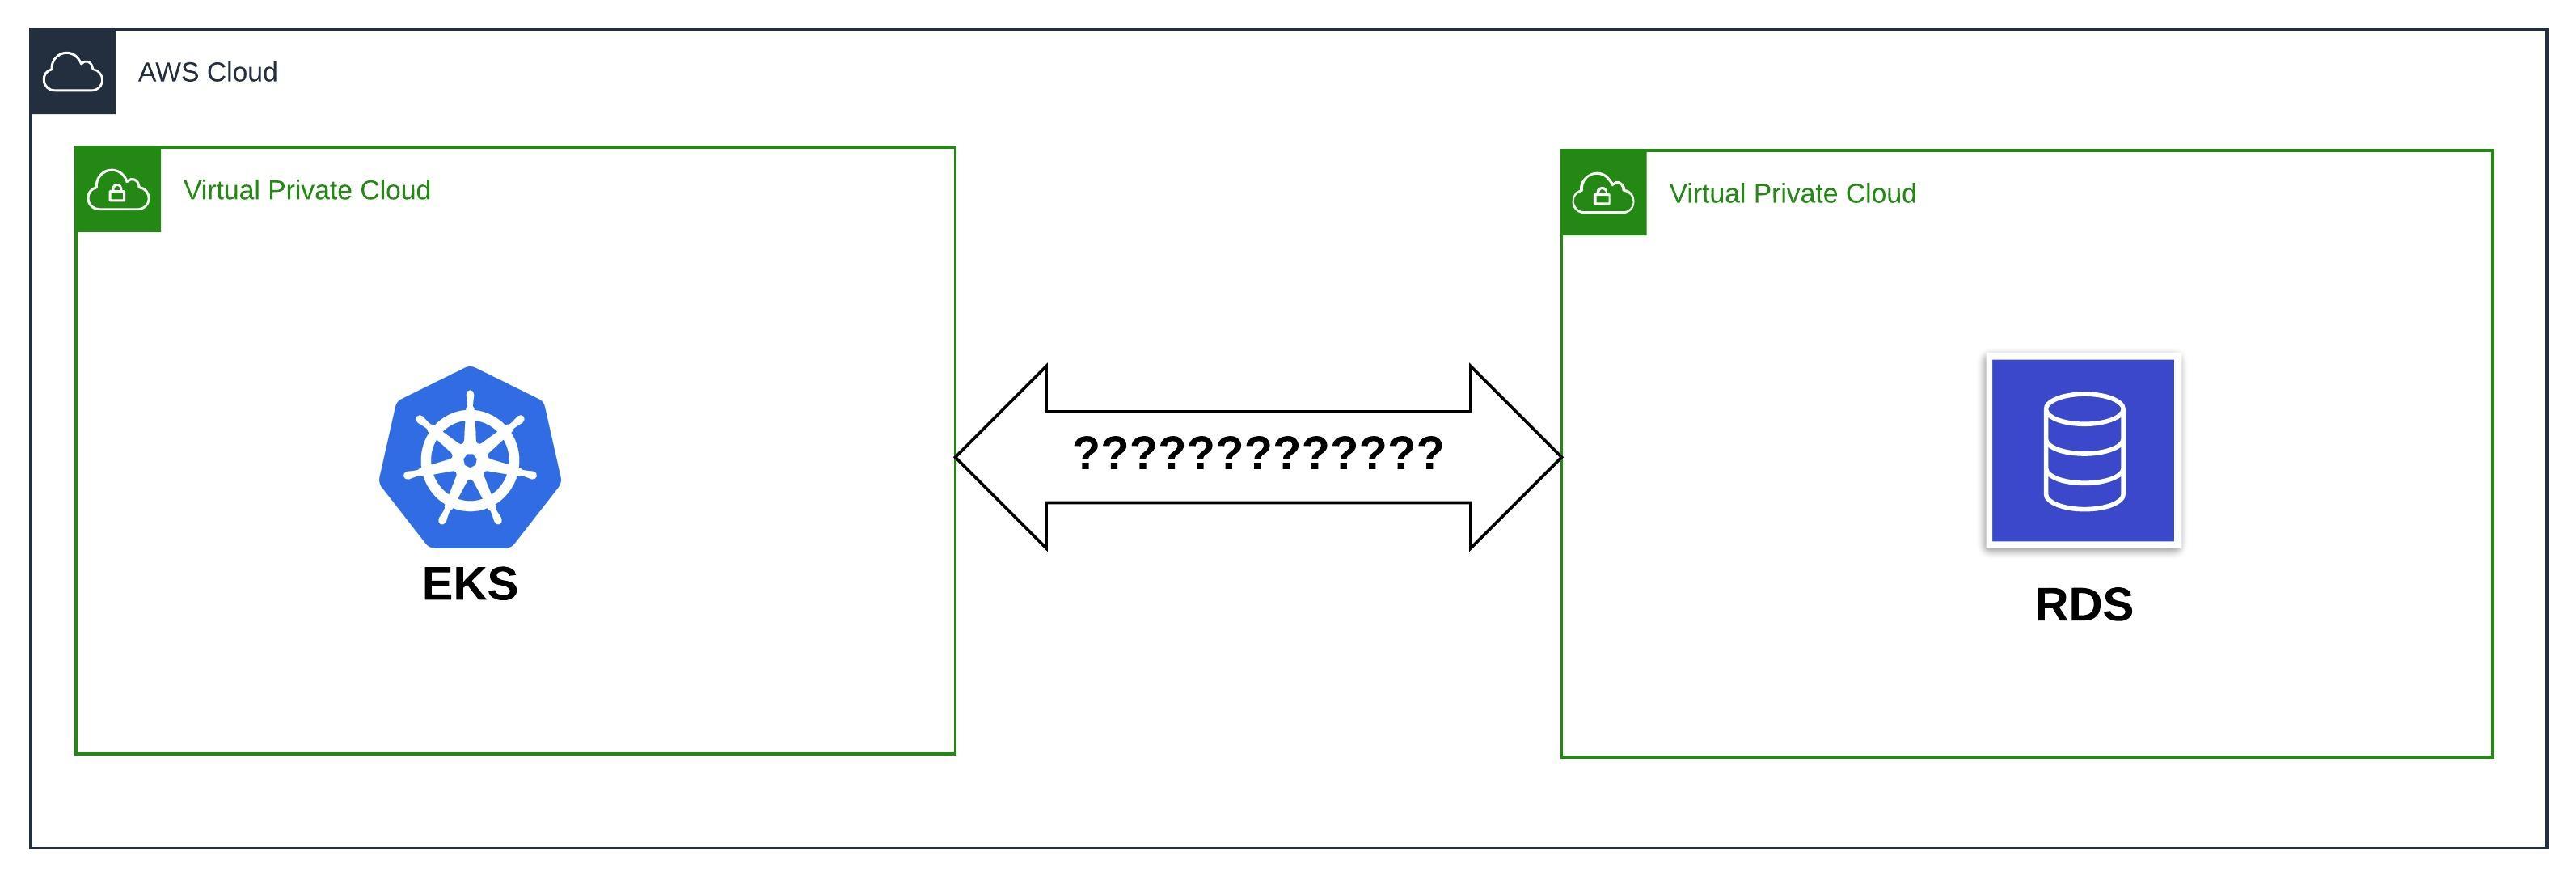
Here's the problem I had to solve: Our service uses Amazon RDS for MySQL. Both the RDS instance(s) and EKS reside within their own dedicated VPC. How do resources running within AWS EKS communicate with the database?
Let's dive right in!
2. Setup the MySQL Database (Amazon RDS)
We will be using the AWS CLI for setting up MySQL database.
2.1 Create the VPC
We will first create a VPC with the CIDR block 10.0.0.0/24 which accommodate 254 hosts in all. This is more than enough to host our RDS instance.
$ aws ec2 create-vpc --cidr-block 10.0.0.0/24 | jq '{VpcId:.Vpc.VpcId,CidrBlock:.Vpc.CidrBlock}'
{
    "VpcId": "vpc-0cf40a5f6db5eb3cd",
    "CidrBlock": "10.0.0.0/24"
}

# Export the RDS VPC ID for easy reference in the subsequent commands
$ export RDS_VPC_ID=vpc-0cf40a5f6db5eb3cd
2.2 Create the subnets
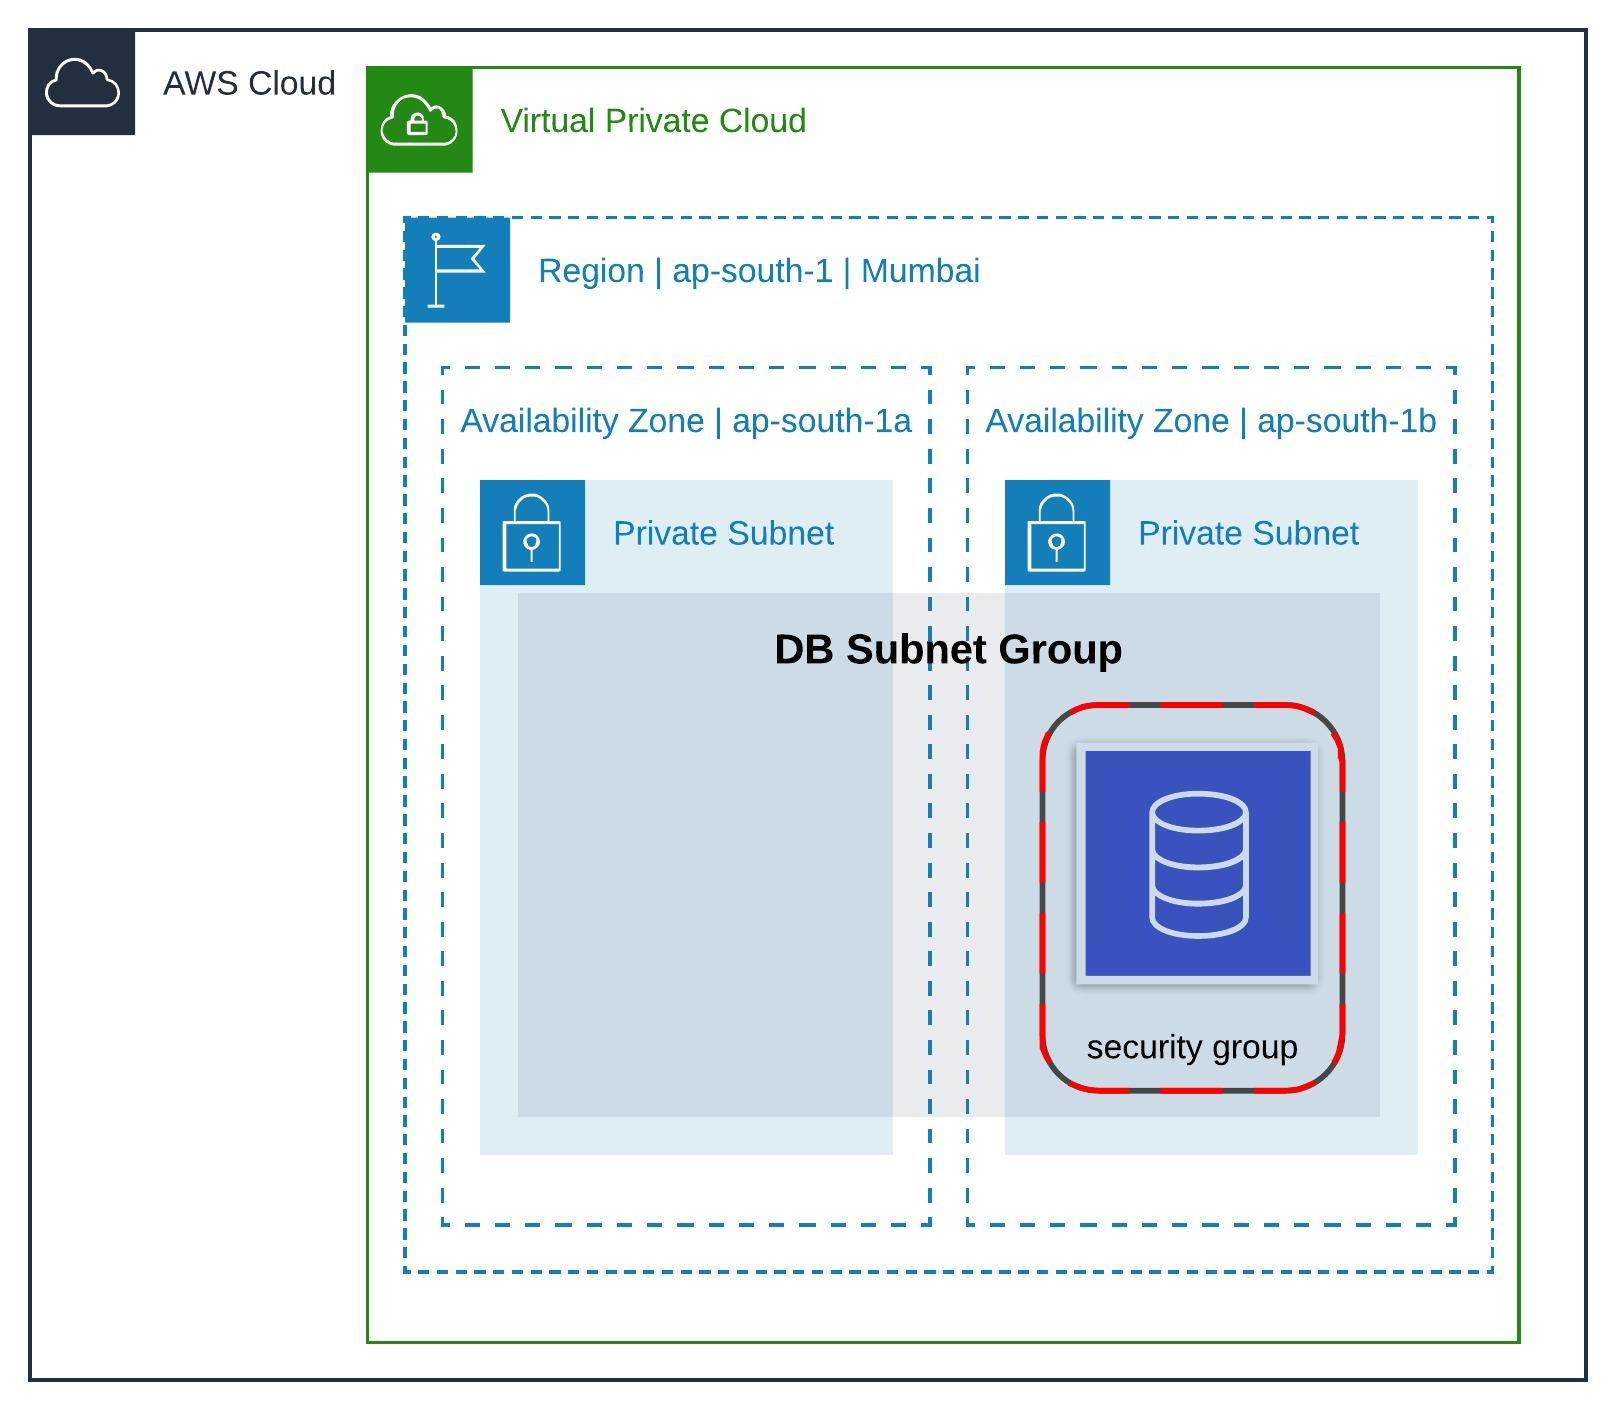
RDS instances launched in a VPC must have a DB subnet group. DB subnet groups are a collection of subnets within a VPC. Each DB subnet group should have subnets in at least two Availability Zones in a given AWS Region.
We will divide the RDS VPC (RDS_VPC_ID) into two equal subnets: 10.0.0.0/25 and 10.0.0.128/25.
So, let's create the first subnet in the availability zone ap-south-1b:
$ aws ec2 create-subnet --availability-zone "ap-south-1b" --vpc-id ${RDS_VPC_ID} --cidr-block 10.0.0.0/25 | jq '{SubnetId:.Subnet.SubnetId,AvailabilityZone:.Subnet.AvailabilityZone,CidrBlock:.Subnet.CidrBlock,VpcId:.Subnet.VpcId}'
# Response:
{
  "SubnetId": "subnet-042a4bee8e92287e8",
  "AvailabilityZone": "ap-south-1b",
  "CidrBlock": "10.0.0.0/25",
  "VpcId": "vpc-0cf40a5f6db5eb3cd"
}
and the second one in the availability zone ap-south-1a
$ aws ec2 create-subnet --availability-zone "ap-south-1a" --vpc-id ${RDS_VPC_ID} --cidr-block 10.0.0.128/25 | jq '{SubnetId:.Subnet.SubnetId,AvailabilityZone:.Subnet.AvailabilityZone,CidrBlock:.Subnet.CidrBlock,VpcId:.Subnet.VpcId}'
# Response:
{
  "SubnetId": "subnet-0c01a5ba480b930f4",
  "AvailabilityZone": "ap-south-1a",
  "CidrBlock": "10.0.0.128/25",
  "VpcId": "vpc-0cf40a5f6db5eb3cd"
}
Each VPC has an implicit router which controls where network traffic is directed. Each subnet in a VPC must be explicitly associated with a route table, which controls the routing for the subnet.
Let's go ahead and associate these two subnet that we created, to the VPC's route table:
# Fetch the route table information
$ aws ec2 describe-route-tables --filters Name=vpc-id,Values=${RDS_VPC_ID} | jq '.RouteTables[0].RouteTableId'
"rtb-0e680357de97595b1"

# For easy reference
$ export RDS_ROUTE_TABLE_ID=rtb-0e680357de97595b1

# Associate the first subnet with the route table
$ aws ec2 associate-route-table --route-table-id rtb-0e680357de97595b1 --subnet-id subnet-042a4bee8e92287e8
{
    "AssociationId": "rtbassoc-02198db22b2d36c97"
}

# Associate the second subnet with the route table
$ aws ec2 associate-route-table --route-table-id rtb-0e680357de97595b1 --subnet-id subnet-0c01a5ba480b930f4
{
    "AssociationId": "rtbassoc-0e5c3959d360c92ab"
}
2.3 Create DB Subnet Group
Now that we have two subnets spanning two availability zones, we can go ahead and create the DB subnet group.
$ aws rds create-db-subnet-group --db-subnet-group-name  "DemoDBSubnetGroup" --db-subnet-group-description "Demo DB Subnet Group" --subnet-ids "subnet-042a4bee8e92287e8" "subnet-0c01a5ba480b930f4" | jq '{DBSubnetGroupName:.DBSubnetGroup.DBSubnetGroupName,VpcId:.DBSubnetGroup.VpcId,Subnets:.DBSubnetGroup.Subnets[].SubnetIdentifier}'
# Response:
{
  "DBSubnetGroupName": "demodbsubnetgroup",
  "VpcId": "vpc-0cf40a5f6db5eb3cd",
  "Subnets": "subnet-0c01a5ba480b930f4"
}
{
  "DBSubnetGroupName": "demodbsubnetgroup",
  "VpcId": "vpc-0cf40a5f6db5eb3cd",
  "Subnets": "subnet-042a4bee8e92287e8"
}
2.4 Create a VPC Security Group
The penultimate step to creating the DB instance is creating a VPC security group, an instance level virtual firewall with rules to control inbound and outbound traffic.
$ aws ec2 create-security-group --group-name DemoRDSSecurityGroup --description "Demo RDS security group" --vpc-id ${RDS_VPC_ID}
{
    "GroupId": "sg-06800acf8d6279971"
}

# Export the RDS VPC Security Group ID for easy reference in the subsequent commands
$ export RDS_VPC_SECURITY_GROUP_ID=sg-06800acf8d6279971
We will use this security group at a later point, to set an inbound rule to allow all traffic from the EKS cluster to the RDS instance.
2.5 Create a DB Instance in the VPC
$ aws rds create-db-instance \
--db-name demordsmyqldb \
--db-instance-identifier demordsmyqldbinstance \
--allocated-storage 10 \
--db-instance-class db.t2.micro \
--engine mysql \
--engine-version "5.7.26" \
--master-username demoappuser \
--master-user-password demoappuserpassword \
--no-publicly-accessible \
--vpc-security-group-ids ${RDS_VPC_SECURITY_GROUP_ID} \
--db-subnet-group-name "demodbsubnetgroup" \
--availability-zone ap-south-1b \
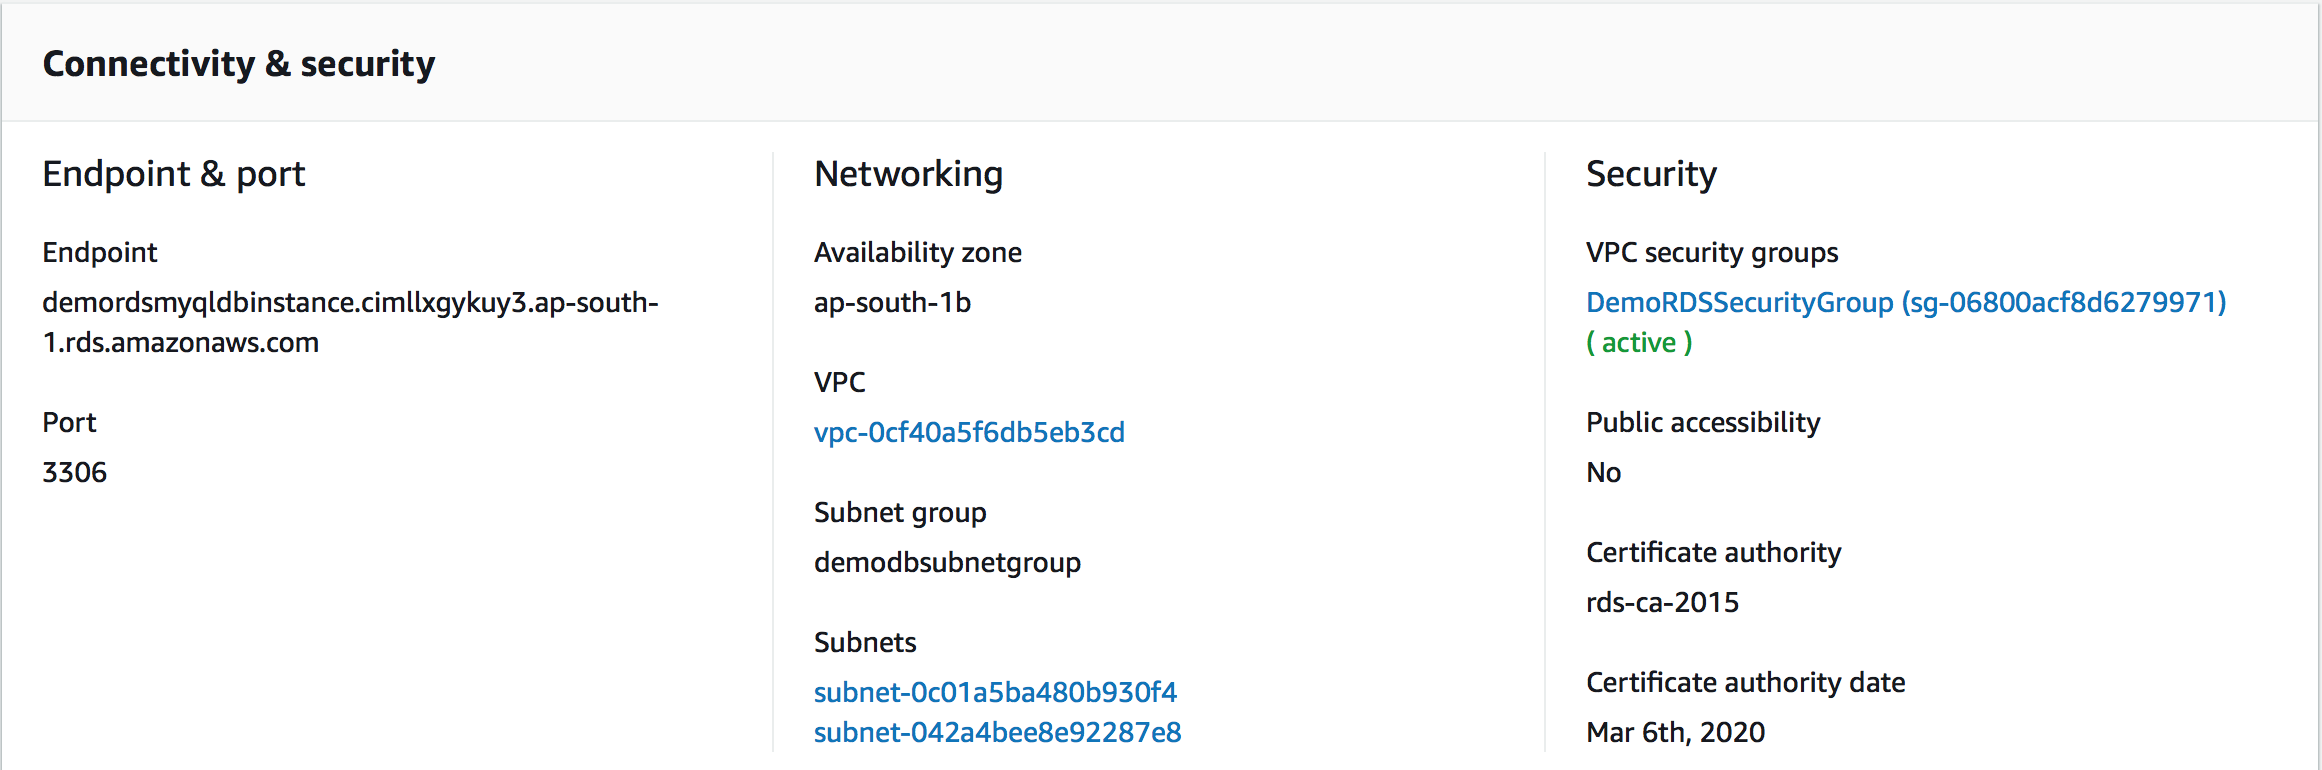
--port 3306 | jq '{DBInstanceIdentifier:.DBInstance.DBInstanceIdentifier,Engine:.DBInstance.Engine,DBName:.DBInstance.DBName,VpcSecurityGroups:.DBInstance.VpcSecurityGroups,EngineVersion:.DBInstance.EngineVersion,PubliclyAccessible:.DBInstance.PubliclyAccessible}'
# Respone:
{
"DBInstanceIdentifier": "demordsmyqldbinstance",
"Engine": "mysql",
"DBName": "demordsmyqldb",
"VpcSecurityGroups": [
{
"VpcSecurityGroupId": "sg-06800acf8d6279971",
"Status": "active"
}
],
"EngineVersion": "5.7.26",
"PubliclyAccessible": false
}
We can verify that the DB instance has been created in the UI as well:
2.6 Amazon RDS setup diagram
3. Setup the EKS cluster
Spinning up an EKS cluster on AWS is as simple as:
$ eksctl create cluster --name=demo-eks-cluster --nodes=2 --region=ap-south-1
[ℹ]  using region ap-south-1
[ℹ]  setting availability zones to [ap-south-1a ap-south-1c ap-south-1b]
[ℹ]  subnets for ap-south-1a - public:192.168.0.0/19 private:192.168.96.0/19
[ℹ]  subnets for ap-south-1c - public:192.168.32.0/19 private:192.168.128.0/19
[ℹ]  subnets for ap-south-1b - public:192.168.64.0/19 private:192.168.160.0/19
[ℹ]  nodegroup "ng-ae09882f" will use "ami-09c3eb35bb3be46a4" [AmazonLinux2/1.12]
[ℹ]  creating EKS cluster "demo-eks-cluster" in "ap-south-1" region
[ℹ]  will create 2 separate CloudFormation stacks for cluster itself and the initial nodegroup
[ℹ]  if you encounter any issues, check CloudFormation console or try 'eksctl utils describe-stacks --region=ap-south-1 --name=demo-eks-cluster'
[ℹ]  2 sequential tasks: { create cluster control plane "demo-eks-cluster", create nodegroup "ng-ae09882f" }
[ℹ]  building cluster stack "eksctl-demo-eks-cluster-cluster"
[ℹ]  deploying stack "eksctl-demo-eks-cluster-cluster"
[ℹ]  building nodegroup stack "eksctl-demo-eks-cluster-nodegroup-ng-ae09882f"
[ℹ]  --nodes-min=2 was set automatically for nodegroup ng-ae09882f
[ℹ]  --nodes-max=2 was set automatically for nodegroup ng-ae09882f
[ℹ]  deploying stack "eksctl-demo-eks-cluster-nodegroup-ng-ae09882f"
[✔]  all EKS cluster resource for "demo-eks-cluster" had been created
[✔]  saved kubeconfig as "/Users/Bensooraj/.kube/config"
[ℹ]  adding role "arn:aws:iam::account_number:role/eksctl-demo-eks-cluster-nodegroup-NodeInstanceRole-1631FNZJZTDSK" to auth ConfigMap
[ℹ]  nodegroup "ng-ae09882f" has 0 node(s)
[ℹ]  waiting for at least 2 node(s) to become ready in "ng-ae09882f"
[ℹ]  nodegroup "ng-ae09882f" has 2 node(s)
[ℹ]  node "ip-192-168-30-190.ap-south-1.compute.internal" is ready
[ℹ]  node "ip-192-168-92-207.ap-south-1.compute.internal" is ready
[ℹ]  kubectl command should work with "/Users/Bensooraj/.kube/config", try 'kubectl get nodes'
[✔]  EKS cluster "demo-eks-cluster" in "ap-south-1" region is ready
We will create a kubernetes Service named mysql-service of type ExternalName aliasing the RDS endpoint demordsmyqldbinstance.cimllxgykuy3.ap-south-1.rds.amazonaws.com.
Run kubectl apply -f mysql-service.yaml to create the service.
# mysql-service.yaml
apiVersion: v1
kind: Service
metadata:
  labels:
    app: mysql-service
  name: mysql-service
spec:
  externalName: demordsmyqldbinstance.cimllxgykuy3.ap-south-1.rds.amazonaws.com
  selector:
    app: mysql-service
  type: ExternalName
status:
  loadBalancer: {}
Now, clients running inside the pods within the cluster can connect to the RDS instance using mysql-service.
Let's test the connect using a throwaway busybox pod:
$ kubectl run -i --tty --rm debug --image=busybox --restart=Never -- sh
If you don't see a command prompt, try pressing enter.
/ # nc mysql-service 3306
^Cpunt!
It is evident that the pod is unable to get through! Let's solve the problem now.
4. Let's build the bridge!
We are going to create a VPC Peering Connection to facilitate communication between the resources in the two VPCs. According to the documentation:
A VPC peering connection is a networking connection between two VPCs that enables you to route traffic between them using private IPv4 addresses or IPv6 addresses. Instances in either VPC can communicate with each other as if they are within the same network. You can create a VPC peering connection between your own VPCs, or with a VPC in another AWS account. The VPCs can be in different regions (also known as an inter-region VPC peering connection).
4.1 Create and Accept a VPC Peering Connection
To create a VPC peering connection, navigate to:
-
VPC console: https://console.aws.amazon.com/vpc/
-
Select
Peering Connectionsand click onCreate Peering Connection. -
Configure the details as follows (select the EKS VPC as the
Requesterand the RDS VPC as theAccepter):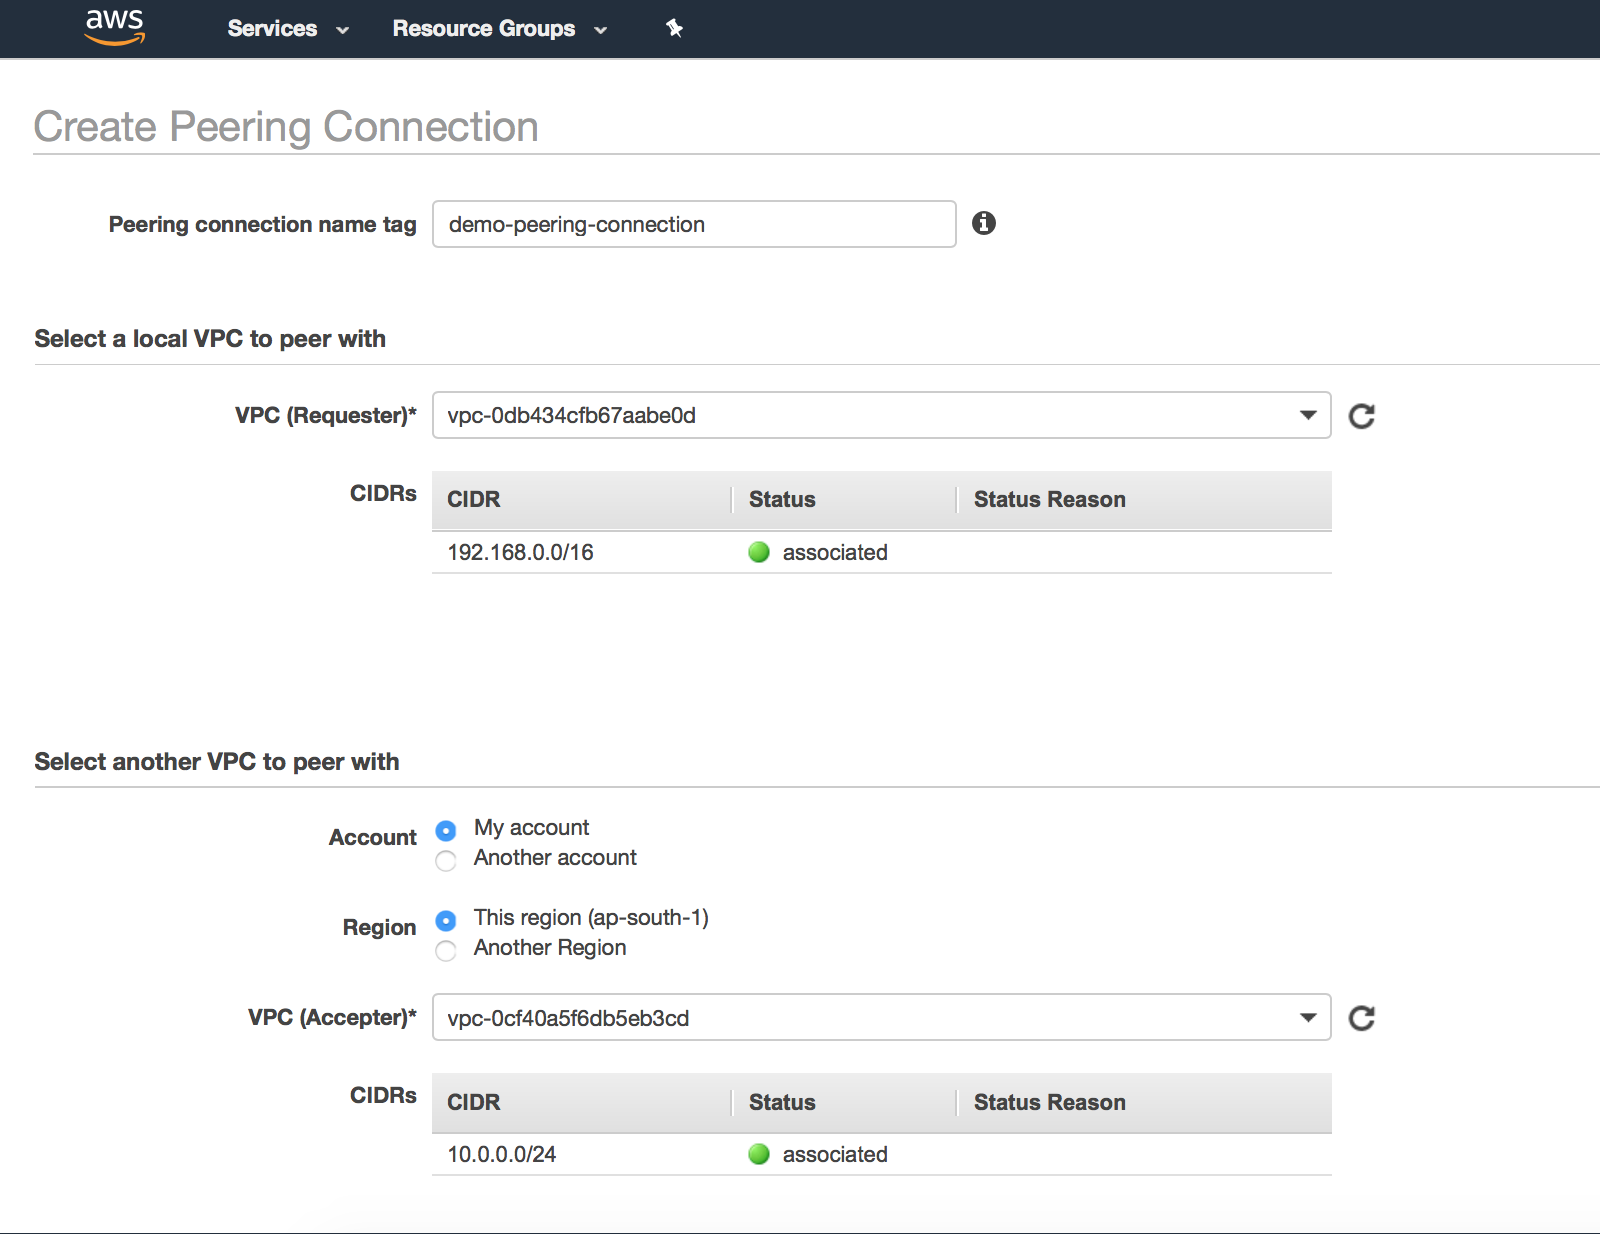
-
Click on
Create Peering Connection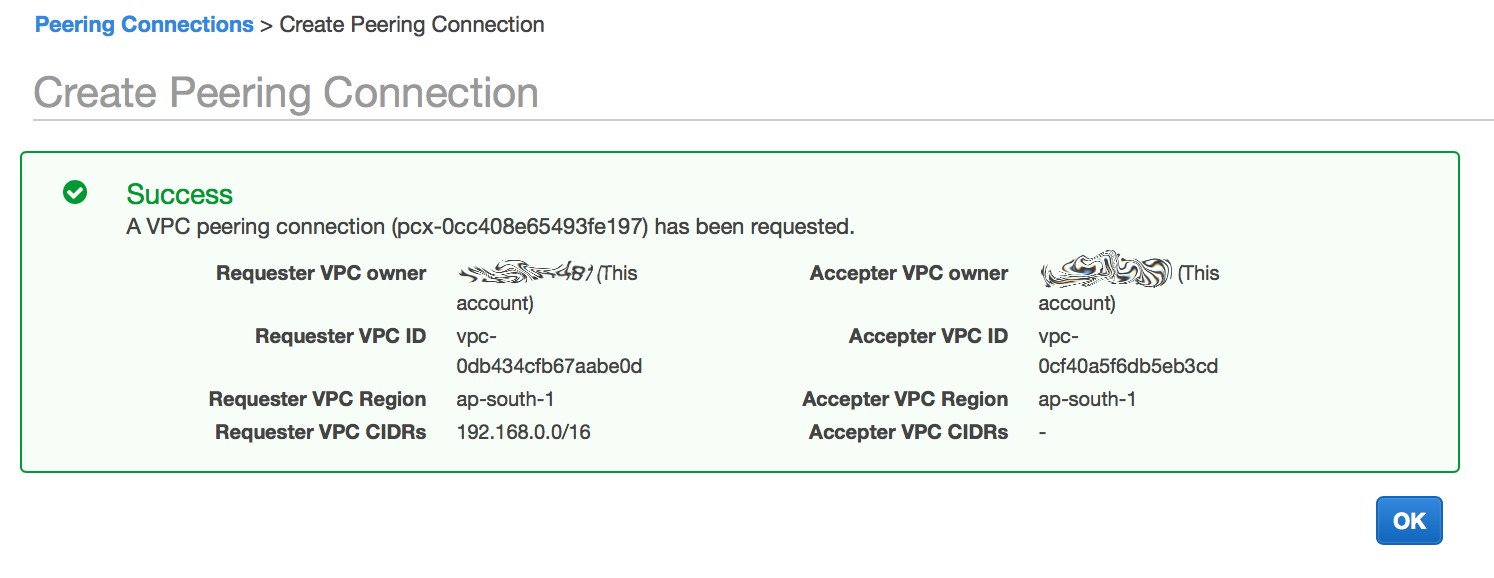
-
Select the
Peering Connectionthat we just created. Click onActions=>Accept. Again, in the confirmation dialog box, click onYes, Accept.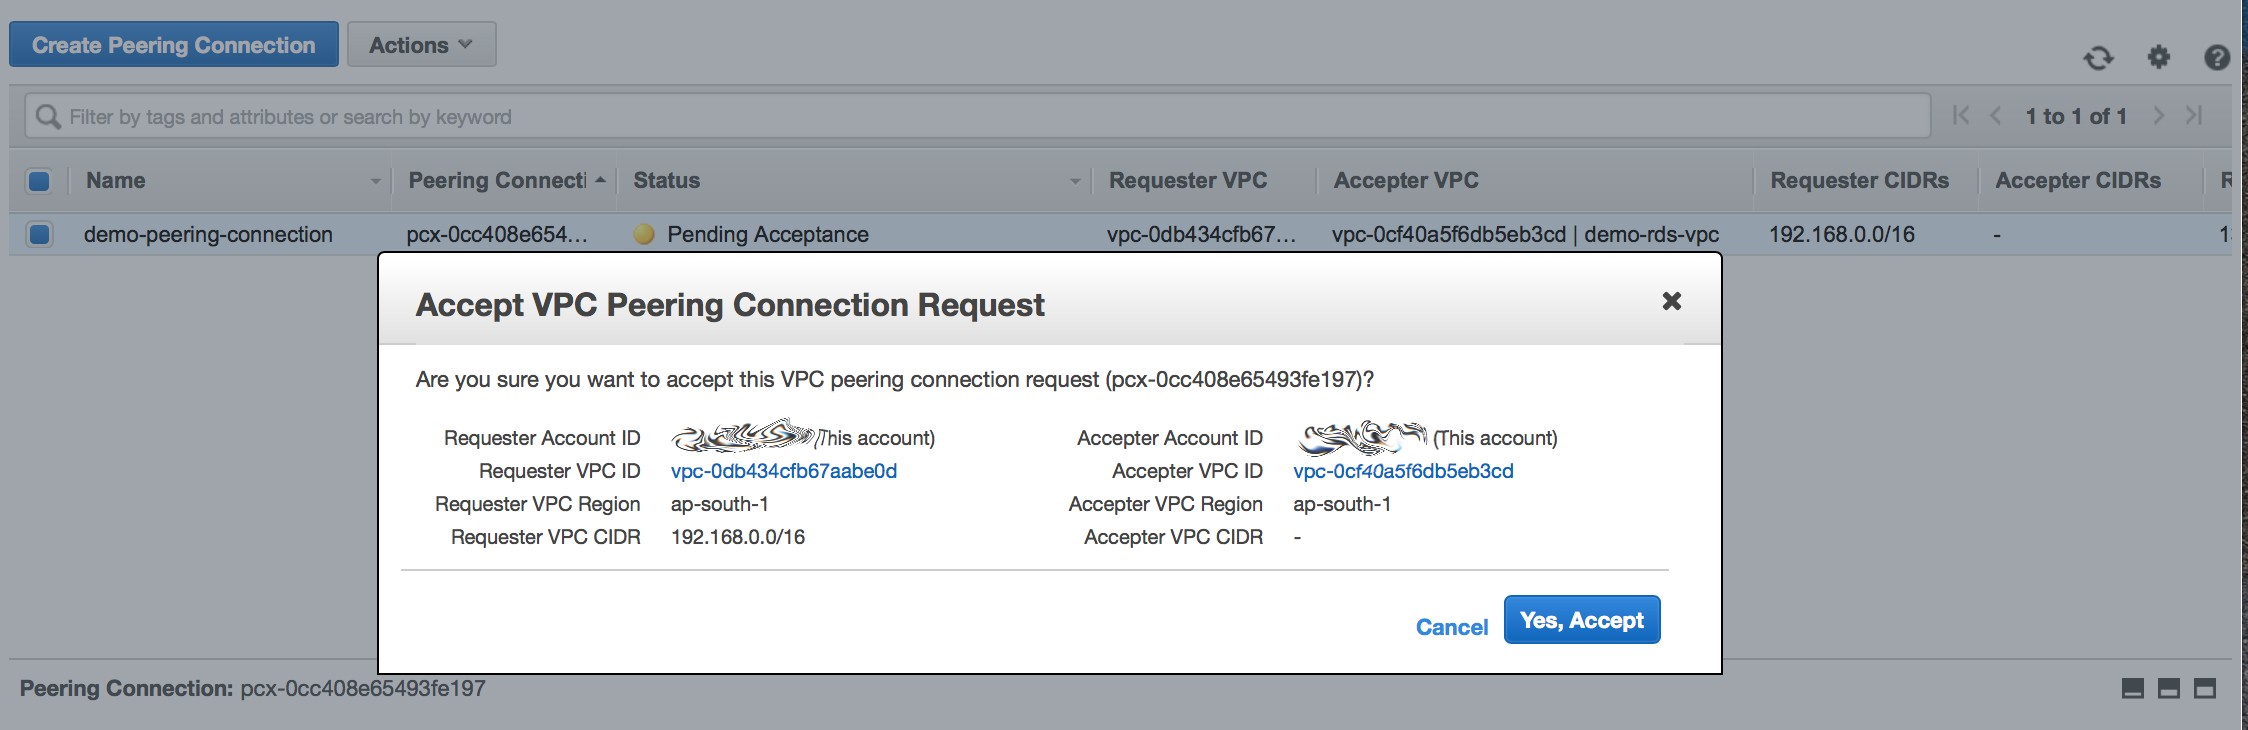
Don't forget to export the VPC Peering Connection ID:
$ export VPC_PEERING_CONNECTION_ID=pcx-0cc408e65493fe197
4.2 Update the EKS cluster VPC's route table
# Fetch the route table associated with the 3 public subnets of the VPC created by `eksctl`:
$ aws ec2 describe-route-tables --filters Name="tag:aws:cloudformation:logical-id",Values="PublicRouteTable" | jq '.RouteTables[0].RouteTableId'
"rtb-06103bd0704b3a9ee"

# For easy reference
export EKS_ROUTE_TABLE_ID=rtb-06103bd0704b3a9ee

# Add route: All traffic to (destination) the RDS VPC CIDR block is via the VPC Peering Connection (target)
$ aws ec2 create-route --route-table-id ${EKS_ROUTE_TABLE_ID} --destination-cidr-block 10.0.0.0/24 --vpc-peering-connection-id ${VPC_PEERING_CONNECTION_ID}
{
    "Return": true
}
4.3 Update the RDS VPC's route table
# Add route: All traffic to (destination) the EKS cluster CIDR block is via the VPC Peering Connection (target)
$ aws ec2 create-route --route-table-id ${RDS_ROUTE_TABLE_ID} --destination-cidr-block 192.168.0.0/16 --vpc-peering-connection-id ${VPC_PEERING_CONNECTION_ID}
{
    "Return": true
}
4.4 Update the RDS instance's security group
Allow all ingress traffic from the EKS cluster to the RDS instance on port 3306:
$ aws ec2 authorize-security-group-ingress --group-id ${RDS_VPC_SECURITY_GROUP_ID} --protocol tcp --port 3306 --cidr 192.168.0.0/16
5. Test the connection
$ kubectl run -i --tty --rm debug --image=busybox --restart=Never -- sh
If you don't see a command prompt, try pressing enter.
/ # nc mysql-service 3306
N
5.7.26-logR&=lk`xTH???mj	_5#K)>mysql_native_password
We can see that busybox can now successfully talk to the RDS instance using the service mysql-service.
That said, this is what our final setup looks like:
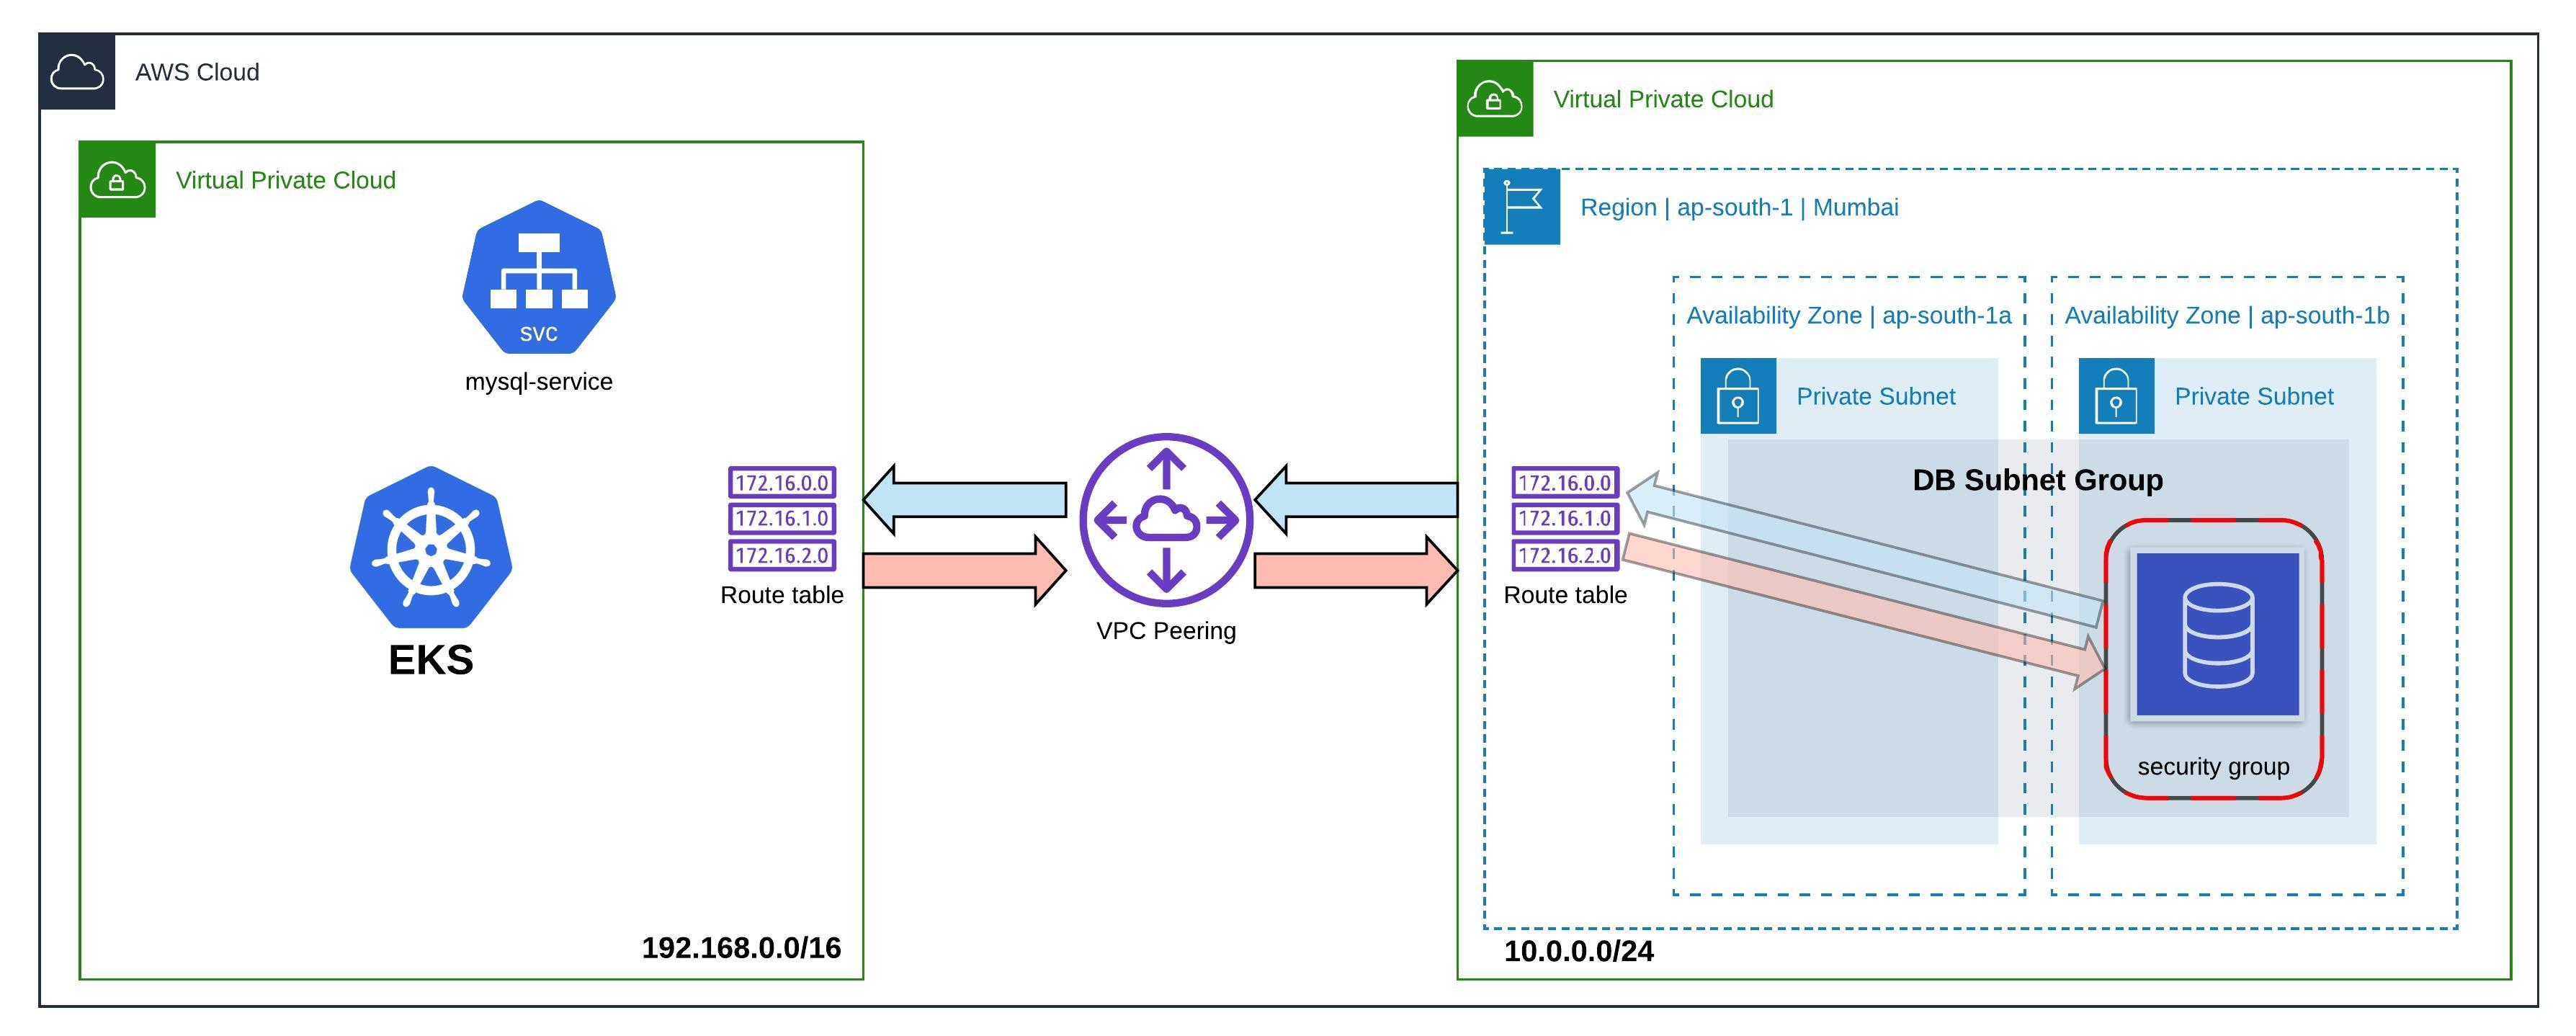
Note:
This setup allows all pods in the EKS cluster to access the RDS instance. Depending on your use case, this may or may not be ideal to your architecture. To implement more fine-grained access control, considering setting up a NetworkPolicy resource.
Useful resources: